
Or How To Change The Ringtone And Idle Logo On The Cisco 7940G IP Phone
Quick-Links
- Pre-requisites
- Setup a TFTP server
- Configure the phone to use your TFTP server
- Get the phone configuration data
- Modify the configuration files
- Create a new logo
- Create a new ringtone
- Update the phone
- Notes and troubleshooting
- Samples
- Resources
I want to point out right at the start that this is what I've put together after gleaning information from various sources on the Internet. I don't really know what I'm doing!
I was sitting around doing nothing at work yesterday and I started fiddling with my desk phone, a Cisco 7940 IP Phone. I changed the ringtone and reached the Network Configuration menu. I noticed the phone's IP and just for the heck of it, tried to open it up in the browser. Surprise! It shows a lot of the details of the phone and its network settings.
I then realized that there was more to the device than it would appear and I Google'd around for some hacks. The first few things I came across were that it was possible to load your own ringtones and change the idle logo.
I then realized that there was more to the device than it would appear and I Google'd around for some hacks. The first few things I came across were that it was possible to load your own ringtones and change the idle logo.
Before you make any changes, make sure you note down the original value/ setting! You don't want to be calling your Help-Desk and explaining to them what you were doing!
You can save almost all the relevant information by going to http://[your-phone-ip-address] in your browser and choosing the Network Configuration link. You should see a page that looks like:
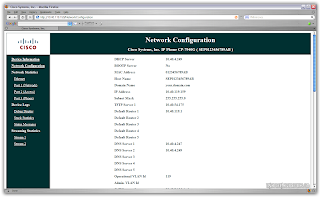
You can save/ print this page for future reference and roll-backs. To get your phones IP address, check under Settings > Network Configuration on the phone.
Pre-requisites
You're going to need the following things for this:
- A Cisco IP Phone - I've got the 7940 model but from what I can tell, these steps should work on other similar ones also.
- A TFTP server - I used the free TFTP server from SolarWinds
- A web server - This applies only if you want to change the logo.
- A utility to convert images to CIP - Again, this applies only if you want to change the logo. And if you don't want to be coding the required files by hand! Cisco provides an SDK that includes these but you need to register on the site ( and you might need to enter contract details, which might not be possible if the phone is at your workplace ). I wasn't able to complete the registration, kept getting session timeout errors so, I'm not sure how/ if this works.
I used the free utilities by Mark Palmer that can be downloaded from http://search.cpan.org/~mrpalmer/Cisco-IPPhone-0.05 - An image editor that supports GIFs and resizing - Again, you'll only need this to create logos. I used Adobe Photoshop but any decent editor should server you well.
- An audio editor that supports creation of RAW audio files - This only applies if you want to be able to create ringtones. I used the trial version of GoldWave; it’ll let you perform 150 commands in a session and up to 2000 commands after which the trial version will expire.
Setup a TFTP server
TFTP is NOT the same as FTP! The servers/clients are not interchangeable!
Your OS probably has a built-in TFTP client ( try typing tftp at the console ) but you'll need a server.
Your OS probably has a built-in TFTP client ( try typing tftp at the console ) but you'll need a server.
The phone uses TFTP to pick up its configuration files when it boots. Usually this is some server that the IT department in your company maintains but you can easily modify the phone's settings to use your private TFTP server instead.
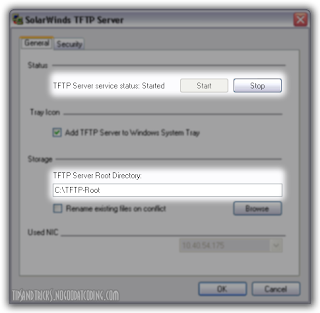
The SolarWinds TFTP server is really simple to use. Simply install and run the application. Choose File > Configure. Modify the options as you see fit. Do note down the TFTP Server Root Directory ( C:\TFTP-Root by default ). Don't forget to start the service!

The SolarWinds TFTP server is really simple to use. Simply install and run the application. Choose File > Configure. Modify the options as you see fit. Do note down the TFTP Server Root Directory ( C:\TFTP-Root by default ). Don't forget to start the service!
The SolarWinds TFTP server automatically logs all the requests it gets. If you're using some other server, see if you can/ need to increase the logging level, at least initially, to get a list of files required.
That's it; your TFTP server is now running. You can check it with the command line TFTP client that Windows XP and Mac OS X have ( I don't know about Linux but I'm sure it must! ). Go to the command line and type in tftp. On Windows XP, you'll get the following:
C:\>tftp

Transfers files to and from a remote computer running the TFTP service.

TFTP [-i] host [GET | PUT] source [destination]

-i              Specifies binary image transfer mode (also called
octet). In binary image mode the file is moved
literally, byte by byte. Use this mode when
transferring binary files.
host            Specifies the local or remote host.
GET             Transfers the file destination on the remote host to
the file source on the local host.
PUT             Transfers the file source on the local host to
the file destination on the remote host.
source          Specifies the file to transfer.
destination     Specifies where to transfer the file.


C:\>
On the Mac, you'll simply get the TFTP prompt: tftp>
The command is not very hard to figure out so I'll leave out part explaining how to use it.
The command is not very hard to figure out so I'll leave out part explaining how to use it.
Configure the phone to use your TFTP server
Now that you have a TFTP server running you need to point the phone to it. Do the following:
- On the phone, go to the settings menu and select Network Configuration. The options are not editable by default so you need to key in the secret password, **#. You should see the tiny lock icon at the top unlock.
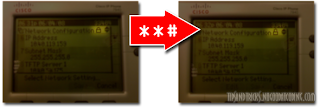
- A long way down in the list of options ( option #32 on my phone ), you'll find the option for Alternate TFTP. You need to set this to YES so that you can change the actual TFTP server address.
- Go back up to the top of the list ( irritating? Yes, I know! But you can key in the option number to speed things up. ) to reach the option for TFTP Server 1. Edit this, type in the IP to your machine and Validate.

Note down the original TFTP server IP address before you modify it!
Get the phone configuration data
As noted above, your TFTP server should be logging all the requests from the phone. This will give you a list of configuration and resource files required by the phone.
You should now use the original TFTP server ( you did note down the IP address didn't you? ) to get all these files ( use the command line TFTP client built-in to your OS ). Then copy them into your TFTP server root so that your phone can pick them up from there instead. Simple, huh?
You should now use the original TFTP server ( you did note down the IP address didn't you? ) to get all these files ( use the command line TFTP client built-in to your OS ). Then copy them into your TFTP server root so that your phone can pick them up from there instead. Simple, huh?
Modify the configuration files
You'll find some XML files in the collateral that you download from the original TFTP server. One of these would be named something like SEP0123456789AB.cnf.xml. This name comes from the host name of your phone ( SEP0123456789AB in this case ) which itself is derived from the MAC address of the phone ( 01-23-45-67-89-AB ). This is the main configuration file.
Open it in any text editor and look for the tag <idleURL>. This points to the place where the 'screensaver' graphics are picked up.
The graphics displayed on the phone are not your usual image files but instead a special XML. You can see how to create the required XML file below. For now, you need to know that you will need to host this XML on a web server on your machine so that the phone can pick it up from there. You can also leave it as it is, the phone will then continue to use the original logo that it had.
Make sure that your web server uses the mime-type text/xml when serving XML!
I spent almost half an hour trying to debug why an XML hosted on Tomcat was not being used for the logo when I could see the phone hitting the correct URL and getting the correct response from the server.
It hit me later that it was probably a mime-type mismatch and I then tried IIS. Voila! That worked! I then checked the responses of each server using the Live HTTP Headers plugin for Firefox and saw the difference in content-type.
Create a new logo
I'd suggest downloading the original XML that the <idleURL> tag was pointing to and putting that on your web server at first. This will help rule out malformed or unsupported images while troubleshooting. Once you get everything setup, you can replace this with your custom file.
The logo is usually in the CIP ( Cisco IP Phone Image document ) format which is an XML file with some specific tags and the image data in hex. You can use the gif2cip application to convert a GIF image into the required XML. The Cisco 7940 IP Phone uses images that are a max of 133 pixels wide by 65 pixels tall. You can find out more about your particular phone model by checking out the Cisco site for appropriate documentation.

The logos seem to come out better if they have minimum gradients, sharp boundaries and fewer colours. You might have to give this quite a few tries to get acceptable results.
Get an image you like, use an image editor to resize it within the supported boundary limits and then save it as a GIF. Use the gif2cip application to convert this to a CIP document. If you have Photoshop, you can also use the plugin to save it directly as a .CIP file. If you open the document in a text editor, you'll see the XML tag for <Prompt>. This is the text that is displayed on the phone when the screensaver is on. Modify it as you see fit.
You can now put up this XML on your web server, ready to be requested by the phone.
The phone requests the logo XML every time the screensaver comes on! This means you could serve this images dynamically to some purpose like random images or whatever else you can think of.
Create a new ringtone

The ringtones supported by the phone must conform to certain strict requirements. I'm not very clear on these.
All I did was use GoldWave to snip out parts of an MP3 and save as a Raw (*.snd) file with the attributes you can see in the image. These worked for me but the length of the tone is pretty short. I'll try out some more options to see if it can be longer but I doubt it.
The ringtones are listed in a file named RINGLIST.XML ( you should have got this from the original TFTP server and it should be available in your TFTP server root directory ). It has entries of the form
<Ring>
    <DisplayName>Are You There 1</DisplayName>
    <FileName>AreYouThere.raw</FileName>
</Ring>
You'll need to add your new ringtone in similar elements. The display name is what the phone shows in its UI. The filename is the name of the ringtone you created ( change the extension to raw if it isn't already ).Save the changes you've made to the file.
If you want to be able to use the ring tones that were available on your phone by default, you will need to get those from the TFTP server as well. The RINGLIST.XML entries will tell you the names of the ringtones and you should put them in your TFTP server root directory along with the rest of the files.
Update the phone
Now that you've got all your stuff ready and made all necessary configuration changes, you're ready to try it out!
The phone picks up configuration files only when it's booting. So you can either unplug then replug it or use **#** while in the Network Configuration menu.
You should see your TFTP server logging requests for various files, just like before. Only this time, it actually has those files and can serve them up to the phone! Once it's done booting, you should see the logo come up after the default idle timeout ( you can change this too; check the SEP0123456789AB.cnf.xml we modified earlier for <idleTimeout> ).
If you followed my suggestion earlier and used your original XML, you should now replace it with your custom file and refresh the screensaver ( you don't need to restart the phone, you can either select Update or just perform some action, like picking up the handset and putting it back; that interrupts the screensaver and then starts it again ). If everything has been setup correctly, you should see the image you want!
Your ringtone should be listed under Settings > Ring Type > Default Ring. When you choose to Play the file, you should see a request on your TFTP server, for the corresponding .raw audio file. If it's too big or not in the correct format, you'll see errors. If it's acceptable, you'll hear your ringtone play.
Notes and troubleshooting
Like I mentioned earlier, I got this to work on the Cisco 7940 IP Phone specifically, using instructions and information from various sources. So I'm not sure how this applies to other models. However, the following checklist should help you locate the problem:
Verify that your TFTP server is working properly by trying to fetch a file using a client other than the phone.
Verify that the changes you made to the TFTP server IP address on your phone have indeed been saved.
Verify that your server is not logging any failed file transfers. If it is, you may have forgotten to get some files from the original TFTP server or you mustn't have placed them in the current TFTP server's root directory.
Verify that you've modified the <idleURL> tag to point to the correct location of the logo.
Verify that the changed URL for the logo is seen in the settings on the phone, to make sure it's picking up the correct configuration.
Verify that you can fetch the required logo XML from your web server by using a browser to hit the URL. Also verify the content-type being returned by the server; my phone required it to be text/xml.
Once you try to load your ringtone, you should see a request for the *.raw audio file getting logged by the TFTP server. Verify that it's the correct filename.
If the phone displays an error, try to make the ringtone again. The requirements are pretty strict and you may need to snip quite a bit of the audio to be able to load the file onto the phone.
Samples
You can try out some of these sample logos and ringtones that I'd made; they're working for me and could be a starting point for you in case you don't have immediate access to the required tools. Save the files and host them on your server.
Linking directly to these graphics files will probably not work:
- I'm not sure if the phone would pick up something off of the Internet
- Your admin would have proabably restricted access to the Internet from the phone
- The mime-type these servers respond with may not be what the phone expects
Graphics:
The Batman Logo
The Unreal Logo
Ringtones:
The opening notes of the M:I-2 theme
Moby's In My Heart, from the Nokia ad.
You can also get the ringtone of the [Cisco IP] phones from the TV show 24 from here. In case the page is down, you can get the files it linked to from here, here and here.
If you create something that you think others might like, please let me know, I'll link to it in the list above.
Resources
- http://plutor.org/blog/2005/05/05/143338/
- http://blog.johnath.com/index.php/2006/12/05/hacking-the-cisco-79xx-series/
- http://search.cpan.org/~mrpalmer/
- http://www.cisco.com/warp/public/788/AVVID/idle-url.html
- http://www.cisco.com/en/US/docs/voice_ip_comm/cucm/admin/3_0_9/a3rings.html
- http://www.ibm.com/developerworks/wireless/library/wi-voip/
